by Gabby Liau, 12 May 2021
Since 1961 after Professor John McCarthy proposed his idea on letting computing to be organized as a “public utility”, it marks a start to the evolution of cloud computing.
When we let cloud computing to come into our lives, it means that we have the choice to turn our physical utilities like our servers and storage systems into virtual utilities that can be deployed in the cloud environment.
And by doing so, we can be freeee…
-free from the need to take care of the surrounding environment of the physical utilities such as the surrounding temperature and humidity as all of these concerns will be looked after by the service providers;
-free from the limitation on the resources such as the computing power and the storage capacity. We can scale these resources according to our requirement from time to time;
And most importantly, we can be free from the risk that can be brought by the prompt failure of our servers or storage systems as we can easily replicate our utilities and deploy the replicated utility immediately right after the collapse of the in-used utility.
So, how can we actually replicate our utilities so easily?
The answer is — the IMAGE.
The image will carry the entire information about our utilities, such as the type of the operating system it is running, the data and applications it carries, etc..
To illustrate, imagine we have a virtual server deployed in the cloud environment. If say we need to migrate our virtual server into a new region, backing up the server, or to build a new server similar to the existing server in the same/different region, we can create an image from this existing virtual server, and apply the image on a new virtual server.
As such, the new virtual server will carry the same information/similar functionality as the server from which the image was created, and can be deployed as a backup server of the existing server.
IMS (Image Management Service) is a service provided by Huawei Cloud which we can use to create image from our existing ECS (Elastic Cloud Server) or BMS (Bare Metal Server). It makes our life easier when it comes to image creation and management. With IMS, we can easily create the image and provision a new ECS/BMS, with just few clicks.
So, now, let’s get started to create an IMS image from our existing ECS!
Part 1: Make sure you already have an ECS!
Click here and check it out how to create an ECS (Elastic Cloud Server) in Huawei Cloud.

Part 2: Go to IMS (Image Management Service).

After we come to the Image Management Service, we need to choose the type of the image that we want to create.
Since we are creating an image from an existing ECS, we shall choose “Private Images”.
After “Private Images” chosen, click on the “Create Image” red button on the top right corner.

Part 3: Create Image.
During the image-creating process, there are five things we need to pay more attention to:-
First, choose the type of image that we want to create. If we want to create an image containing both system disk and data disk of the existing ECS, then we shall choose “Full-ECS image” as our image type.

Second, choose the source of our image.
Since we are using our existing ECS to create the image, the existing ECS will be the source of the image.

Thirdly, choose the ECS that we want to create the image from.

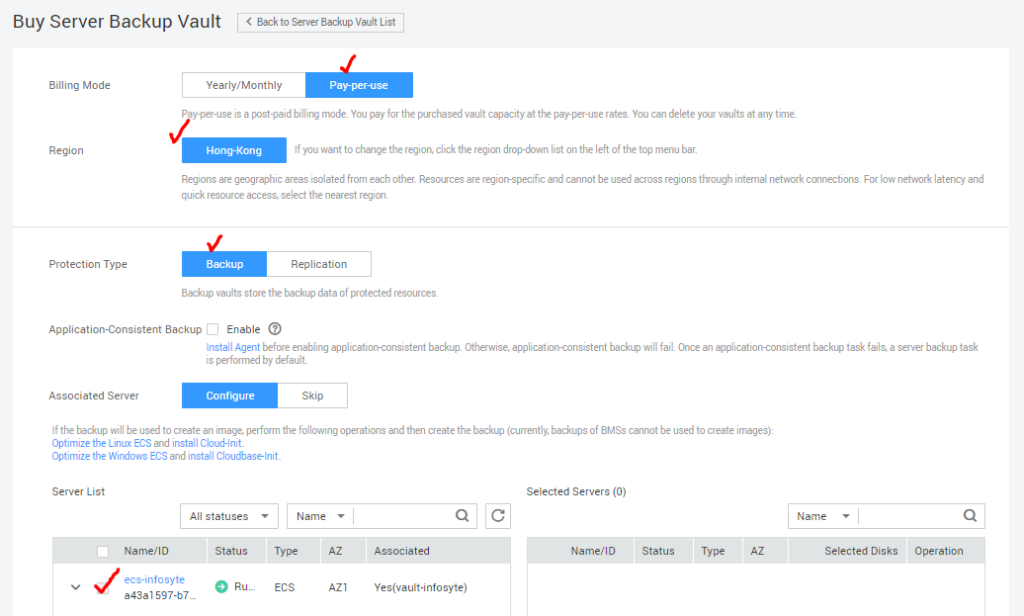
Forth, create or select a server backup vault. (Not required if we are just to create a system disk image or a data disk image)


A backup vault is a storage container that we can organize our backups in.
We will need to define the location of the server-backup vault to be in the same region where our ECS is located. We will associate our ECS (ecs-infosyte) to this backup vault.

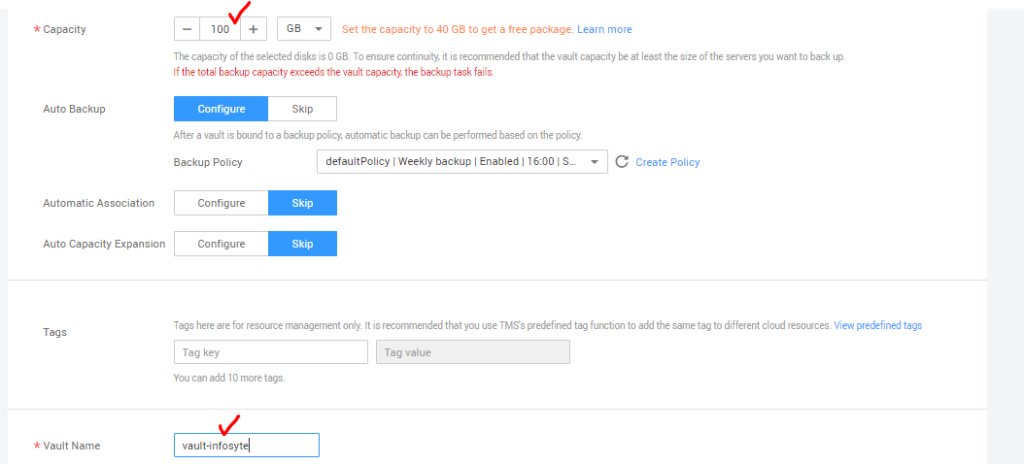
Define the capacity of the backup vault.
One way to define the capacity of the vault can be based on the capacity of our system disk and data disk. For example, if our system disk capacity is 40GB, while our data disk capacity is also 40GB, we can define our backup vault capacity to be 80GB. (Of course, you can also set it higher, or lower if you think you will not going to fully utilize all the capacity of your system and data disks)
Step 4: Verify with the ECS image detail that will be created.

Step 5: Agree to the Image Disclaimer.


That is it!
We have created a full-ECS image containing both our system disk (running on Window Server 2016 Standard 64bit) and our data disk.
We can apply this image for a server so that we can quickly build up a new server when it is needed!


